
The temperature sensor is PT100, which is a platinum wire thermal resistance sensor with good stability and linearity. It can work in the range of -200 ° C to 650 ° C. This circuit is selected to work in the range of -19 ° C to 500 ° C.
This article refers to the address: http://
The whole circuit is divided into two parts, one is the sensor preamplifier circuit, the other is the A/D conversion and display, control, software nonlinear correction and so on.
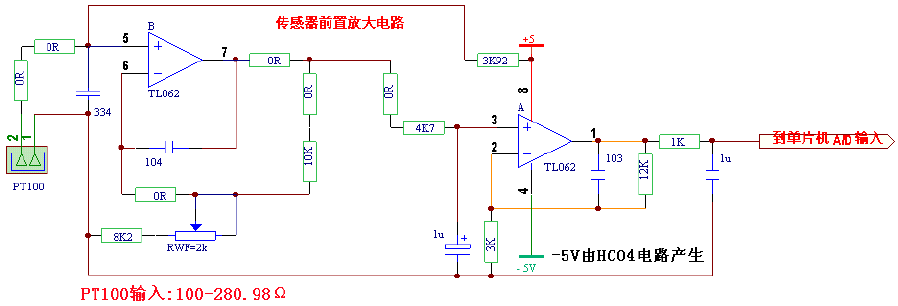
The schematic diagram of the preamplification section is as follows:
working principle:
The sensor access is very simple. It is connected to the PT100 from a 5V supply terminal of the system through only a 3K92 resistor. This connection usually causes serious nonlinear problems, but it is backed by software correction of the microcontroller. , thus simplifying the way the sensor is accessed.
According to the parameters of PT100, the resistance value is from 100 ° to 280.9 Ω in the range of 0 ° C to 500 ° C. According to the series voltage division, we use the formula: Vcc / (PT100 + 3K92) * PT100 = output voltage (mV ), you can calculate its output voltage at 100 ° C, see the table below:
Temperature °C | PT100 resistance Ω | Sensing voltage mV |
0 | 100.00 | 124.38 |
1 | 100.39 | 124.8 |
50 | 119.40 | 147.79 |
100 | 138.51 | 170.64 |
150 | 157.33 | 192.93 |
200 | 175.86 | 214.68 |
250 | 194.10 | 235.90 |
300 | 212.05 | 256.59 |
350 | 229.72 | 276.79 |
400 | 247.09 | 296.48 |
450 | 264.18 | 315.69 |
500 | 280.98 | 334.42 |
When the 10-bit A/D of the MCU is at full scale, the maximum display is 1023 words. In order to obtain the A/D conversion input voltage of the MCU when the output voltage of the PT100 sensor is displayed at 500 words, the original output voltage of the sensor must be amplified and calculated. The formula is: (500/1023 * Vcc) / voltage across the sensor (mV / °C), (Vcc = system power = 5V), you can get a magnification of 10.466.
Description of the magnification: An enthusiastic user friend asks, according to (500/1023 * Vcc) / the voltage across the sensor can not get the result of 10.466, but get the result of 11.635. In fact, the ideal value of 500 words cannot be obtained naturally by the circuit itself. Naturally, the number is only 450 words. Therefore, the value of 500 °C in the formula is 450 instead of 500. 450/1023*5/(0.33442-0.12438)≈10.47. In fact, there are many methods for calculation. The key is to follow the sensor's mV/°C instead of the measured temperature value. Let's look at the nonlinear correction coefficient: 10.47*1.1117=11.639499, so that we are enthusiastic friends. The calculation results are in agreement.
The operational amplifier is divided into two stages, the latter stage is fixed by 5 times (12K/3K+1=5 in the schematic), and the preamplifier is: 10.465922/5=2.0931844 times. In order to prevent components and other deviations during adjustment, use A precision trimmer potentiometer fine-tunes the magnification to ensure a more accurate adjustment to the desired magnification (10K/(8K2+Rw)+1 in the schematic).
Usually, in the temperature measurement circuit, there will be a “zero†and another “fullness†potentiometer to facilitate the correct display of the sensor at “zero†and “fullâ€. This circuit does not use two potentiometers because as long as the "zero degree" adjustment is accurate, the correct display of the entire working range can be guaranteed, and of course the maximum display problem at full scale is also included.
So, how is the "zero degree" handled in the circuit? It is directly subtracted from the "zero" number by the microcontroller program. Within the entire working range, the program automatically subtracts the "zero" value and then uses it as a valid value.
When the supply voltage is deviated, will it cause changes in the sensor input and affect the accuracy? After the power supply changes, the current flowing through the sensor will change, which will change the output voltage of the sensor. However, at the same time, the power supply of the MCU is also receiving this power supply change synchronously. When the A/D reference of the MCU uses the supply voltage, it means that the measurement reference also changes in the same direction. Therefore, as long as the parameters Properly selected, when the system power supply changes within 20%, it will not affect the accuracy of the measurement. (Normally, the MCU system does not allow excessive power supply changes, which is not only a requirement in temperature measurement circuits.)
The schematic diagram of the latter single-chip circuit is as follows:

The signal output from the sensor preamplifier circuit is sent to the A/D conversion input port (PB0/AN0) of the HT46R23, and the MCU performs various necessary processing. The first is to perform software nonlinear correction. The input signal is divided into different segments according to different temperature values, and then multiplied by different compensation coefficients according to the segment in which it is located, so that it is as close as possible to the theoretical value, and the nonlinearly corrected number is It is sent to display, compare the control values ​​set by the user, and so on.
The nonlinear compensation coefficients of each segment are shown in the following table (only the data of the main segment is listed, not all the contents of the table):
Sensing voltage
Sensing voltage | mV/°C | Internal AD reading | Correction coefficient |
124.3781 | Power supply resistance = 3K92 ± 1%, supply voltage = 5.000V ± 1% | ||
124.8450 | 0.4670 | 1.00 | 1.0000 |
147.7942 | 0.4683 | 50.14 | 0.9972 |
170.6414 | 0.4626 | 99.06 | 1.0095 |
192.9326 | 0.4570 | 146.80 | 1.0218 |
214.6802 | 0.4515 | 193.36 | 1.0343 |
235.8961 | 0.4461 | 238.79 | 1.0469 |
256.5918 | 0.4407 | 283.11 | 1.0597 |
276.7898 | 0.4355 | 326.36 | 1.0724 |
296.4779 | 0.4302 | 368.52 | 1.0854 |
315.6891 | 0.4251 | 409.65 | 1.0985 |
334.4220 | 0.4201 | 449.76 | 1.1117 |
Another feature of this circuit is that the user can arbitrarily set 3 overrun control values ​​within the working range. When the measured display value is greater than the set value, the corresponding control port will output a high level. By using this high level signal, and then connecting the circuit of the primary triode drive relay, automatic control can be realized. When a control port outputs a high level, the LED tube connected in series will be lit at the same time to prompt the user which setting value is outputting the control signal.
The 24C02 in the circuit is an electrical memory, which can reliably store the control values ​​set by the user, and will not lose data even if the power is turned off.
There are also 3 buttons in the circuit diagram, which are the “Settingsâ€, “Additions†and “Decrease†operation buttons for the user to set the limit value. The method of use is as follows:
Press the setting button, the screen will display “1--â€, indicating that the first limit is entered now. After three seconds, the screen automatically jumps to display “***†and flashes (*** represents the original power The overrun value stored in the memory), then press the add key (or the down key), the lowest digit on the screen will be increased by one (or minus one), if you press and hold the button for more than three seconds, do not let go, The first two digits on the screen will quickly add (or subtract) the number. After adjusting the number on the screen to the desired number, the limit is set.
Then, press the setting button again to display “2--â€, indicating that the setting of the second over limit is now entered. After three seconds, the screen automatically jumps to display “***†and flashes...., The next operation is exactly the same as the first limit.
The third limit is set exactly the same as the two above.
After setting the 3 limit values, you must also press the set button at the end to exit the set state and return to the normal working state. If you forget the last time you pressed the exit, the program will wait for 10 seconds and then automatically return to normal operation.
Simple debugging method:
A 100Ω resistor can be used to simulate the resistance of the PT100 at 0°C. Connect to the sensor input to see if the display is =000. If not, adjust the trimmer potentiometer to achieve it; then use a 281Ω resistor to simulate the PT100. The resistance value of the sensor at 500 °C should be displayed in 500 words ± 1 word. Finally, a 194 Ω resistor should be used instead of the 250 °C sensor resistance input. It should display 250±1 words. If there is no problem after the above debugging, it can be connected. The real PT100 sensor is put into use. (The real sensor also has errors. You can fine tune the preamplifier potentiometer to correct it.)
In actual work, the supply voltage of the circuit is required to be 5V±5%. If the measured value is greater than a certain limit, the corresponding control port will immediately output a high level.
If the sensor has an open circuit failure, the display will show "HHH". If the sensor and its leads are short-circuited, the display will immediately appear "LLL". In order to prevent the sensor from opening or short-circuiting, it may cause adverse consequences. All three control output ports are turned off first.
Kara offers a wide range of illuminated and non-illuminated Rocker Switches.Ranging from 4 to 9poles,16VA to 30 amp,with many styles of colors and functions,especially the switches with High-Current and some types which meet the industry standard IP65,IP68. Certifications include UL, CSA, TUV, CE, and more.

Middle-Sized Rocker Switches,Middle Rocker Switches,Economic Middle-Sized Rocker Switches,Universal Middle-Sized Rocker Switches
Ningbo Kara Electronic Co.,Ltd. , https://www.kara-switch.com