
The MAX1452 (Figure 1) output signal is an analog voltage that can range from the VDD rail to the VSS rail. The part can be configured to limit (clip) its output voltage to aid in system level diagnostics in sensor applications. This capability can detect open or short circuits caused by wiring or connector falures, and can detect sensor failures.
Forced clipping can be accomplished by using the integrated uncommitted op-amp and a few external resistors. The clip voltage range can be set to be symmetrical or asymmetrical to the supply voltages. The clip voltages are fully ratiometric to the supply voltages, maintaining the ratiometric performance of the system.
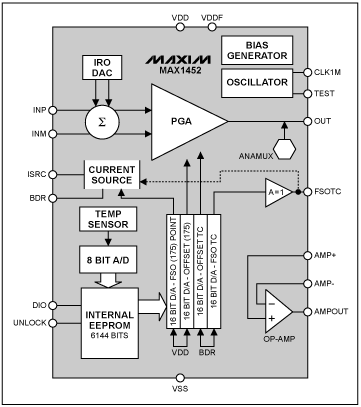
Figure 1. The MAX1452 schematic.
The output clip voltages are referred to as Clip-Top for limiting at the upper voltage range near VDD, and Clip-Bot for limiting at the lower voltage range near VSS. This can be seen graphically in Figure 2 for three different clip-range settings . All signals that would normally result in an output voltage greater than Clip-Top or lower than Clip-Bot will be truncated at the clip level. Over-range signals that would normally result in a saturated high or low output voltage would result in a clipped output at the clip voltage setting. No normal or over-range operation of the circuit can produce a voltage output in-between the clip voltage and the power-supply rail. System fault conditions (a short in wires to sensor, open wires or connections) will produce voltage signals beyond the clip voltage and near the supply-rail voltage.
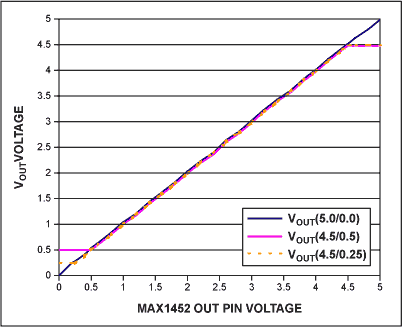
Figure 2. Various output diagnostic clip settings.
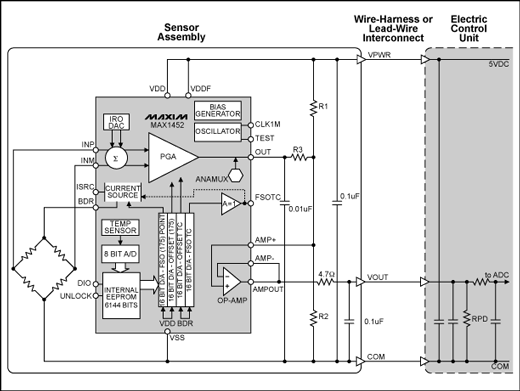
Figure 3. Typical sensor wiring configuration.
The three resistors that form the clip function are R1, R2, and R3, as shown in Figure 4. By selecting values ​​for these resistors, precise clip voltages can be obtained. The op-amp is configured as a voltage follower which provides the drive capability for Vout and buffers the resistor network from changing loads on the Vout line. Symmetrical clipping occurs when R1 = R2. Setting R1 and R2 to different values ​​controls asymmetrical clipping. R3 controls how close the output signal Vout swings toward each rail. Table 1 shows three different clip range conditions created with three different resistor settings.
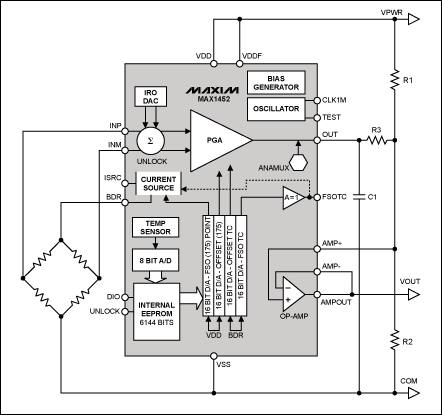
Figure 4. Creating clip-high and clip-low diagnostic voltage limiting.
Table 1. Output Clip Voltage Settings with VDD = 5.0VDC
R1 (Ω) | R2 (Ω) | R3 (Ω) | Output Clip High (V) | Output Clip Low (V) |
10K | 10K | 208 | 4.90 | 0.10 |
10K | 10K | 555 | 4.75 | 0.25 |
10K | 10K | 1.25K | 4.50 | 0.50 |
10K | 5K | 588 | 4.50 | 0.25 |
Housed in compact packages with profiles as low as 0.95 mm, our range of electret condenser Microphones and MEMS microphones offers a variety of performance options to meet the voice capture and audio recording needs of your next design. Our microphones are available with omnidirectional, unidirectional, and Noise Cancelling directivity, while featuring sensitivity ratings from -54 up to -24 dB and signal to noise ratios from 56 up to 72 dBA.
Microphones
Mic Wireless,Wireless Microphone,Bluetooth Microphone,Condenser Microphone
NINGBO SANCO ELECTRONICS CO., LTD. , https://www.sancobuzzer.com